How to Write a Thesis in LaTeX (Part 5): Customising Your Title Page and Abstract
Part 1 | Part 2 | Part 3 | Part 4 | Part 5
Author: Josh Cassidy (August 2013)
This five-part series of articles uses a combination of video and textual descriptions to teach the basics of writing a thesis using LaTeX. These tutorials were first published on the original ShareLateX blog site during August 2013; consequently, today's editor interface (Overleaf) has changed considerably due to the development of ShareLaTeX and the subsequent merger of ShareLaTeX and Overleaf. However, much of the content is still relevant and teaches you some basic LaTeX—skills and expertise that will apply across all platforms.
In the previous post we looked at adding a bibliography to our thesis using the biblatex package. In this, the final post of the series, we're going to look at customising some of the opening pages. In the first video we made a rather makeshift title page using the \maketitle command and by using an \includegraphics command in the \title command. Although this works, it doesn't give us as much flexibility as we may want.
The Title Page
A much better way to do this is to use the titlepage environment. We'll do this in a separate .tex file and then input it. The first thing we'll do is enclose everything in the title page within the center environment so it's all aligned to the centre. Next we need to instruct LaTeX to leave a gap between the top of the page and the first line of text. To do this we use the \vspace command followed by a length. We also need to add an asterisk into the command to make sure LaTeX doesn't decide to ignore the command. Next we'll add the thesis title in bold font using the \textbf command. To leave a gap between this and the next line of text we use the \vspace command again, this time without the asterisk. Next we'll add in a subtitle followed by some more vertical space and then the author name in bold font. This concludes what we want at the top of the title page—the rest of the content we'll add at the bottom of the title page.
To separate these two sections out we'll use the \vfill command which will automatically add in the amount of vertical space needed for the content to fill the page. Next we'll add in a line of text to specify what degree the thesis is being submitted for. The double backslash is used to create a new line. We'll then add more space before adding in the university logo specifying it's width as a fraction of the text width. Finally we'll add in some information about the university and the date.
\begin{titlepage}
   \begin{center}
       \vspace*{1cm}

       \textbf{Thesis Title}

       \vspace{0.5cm}
        Thesis Subtitle

       \vspace{1.5cm}

       \textbf{Author Name}

       \vfill

       A thesis presented for the degree of\\
       Doctor of Philosophy

       \vspace{0.8cm}

       \includegraphics[width=0.4\textwidth]{university}

       Department Name\\
       University Name\\
       Country\\
       Date

   \end{center}
\end{titlepage}
Now in the main .tex file we can replace the \maketitle command with an input command linked to our new title page.
If we now compile the code we can see all the items have been correctly processed:

However, the text is quite small so we'll go back and change the font sizes. To do this we'll use one of the simple font-sizing commands. There are ten of these to choose from, ranging from smallest to largest they are:
\tiny
\scriptsize
\footnotesize
\small
\normalsize
\large
\Large
\LARGE
\huge
\Huge
Let's make the title as big as it can be (using these simple commands) by choosing \Huge. We'll then make the subtitle two steps smaller using \large. When we use one of these commands they affect all the text in it's scope. Therefore in it's current state all the remaining text on the page will appear in the size of the subtitle. We'll keep it like this for the author name and degree title but we'll drop down one size for the university details and the date:
\begin{titlepage}
    \begin{center}
        \vspace*{1cm}

        \Huge
        \textbf{Thesis Title}

        \vspace{0.5cm}
        \LARGE
        Thesis Subtitle

        \vspace{1.5cm}

        \textbf{Author Name}

        \vfill

        A thesis presented for the degree of\\
        Doctor of Philosophy

        \vspace{0.8cm}

        \includegraphics[width=0.4\textwidth]{university}

        \Large
        Department Name\\
        University Name\\
        Country\\
        Date

    \end{center}
\end{titlepage}

The abstract
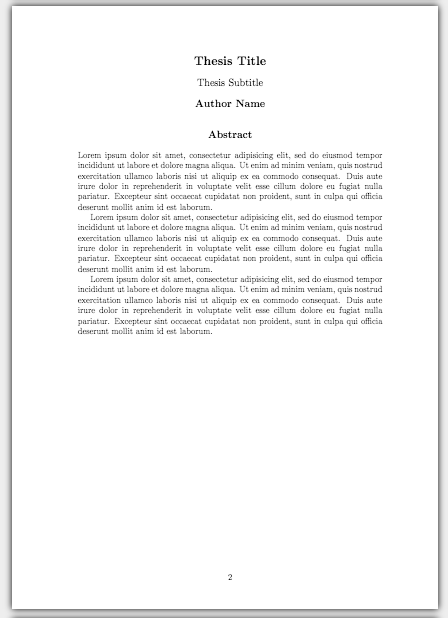
We can also customise other pages, such as the abstract. Instead of using an unnumbered chapter, we'll create a new .tex file, customise the layout and then input it. At the top of this file we need to change the page style to plain in order to stop the headers being added in.
Now in a similar way to the title page we'll add in some custom titles and then the abstract text.
\thispagestyle{plain}
\begin{center}
    \Large
    \textbf{Thesis Title}

    \vspace{0.4cm}
    \large
    Thesis Subtitle

    \vspace{0.4cm}
    \textbf{Author Name}

    \vspace{0.9cm}
    \textbf{Abstract}
\end{center}
Lorem ipsum dolor...
This is what it will look like added in:

This concludes our series on writing a basic thesis. If you want to play around with the thesis we've created in this series you can open the project in Overleaf.